For some reason I seem to be one of those people who will always try something the hard way first and then about half way through realise that there is a much easier option.
So far I have made 8 buildings -mostly terraced houses- for my 6mm campaign which involved a lot of windows all painted by hand. I was in town today when the light bulb flashed on; instead of painting them why not use a chisel-pointed permanent black marker pen. So I've bought one and will try it out...I have high hopes.
I know, sometimes I even amaze myself.

THE WORDS OF SUBEDAI An ongoing monologue about the trials and tribulations of life in general, being an avid reader, figure painter, terrain modeller, part time wargamer -with a rather scary fixation for the Mongols- part time rule writer, aspiring writer and photographer, very amateur artist and being a follower of both West Ham United and Sittingbourne FC...ALL AT THE SAME TIME!!!
Showing posts with label 15mm Terrain. Show all posts
Showing posts with label 15mm Terrain. Show all posts
Sunday, 6 September 2015
Monday, 9 March 2015
Game with Postie's Rejects.
While at Broadside in Sittingbourne last year I got chatting to the group known as Postie's Rejects and was asked if I would like a game someday. Well, that day was yesterday. We had a Crimean War 15mm game to Postie's own rules where the British and French were defending a small town not far from the main supply port on the peninsula (the name escapes me at the moment) against the Russian Bear. I was given the left flank with the British, one Rifle Brigade and three others plus a battery of medium guns. Immediately opposite was Big Lee with eight Russian infantry battalions and a battery of guns. John was our CNC in the centre with Ray on the right. Opposite them were Ian, John and Smiffy.
The game started well as my infantry fairly barrelled along the road to protect the left of the village, while our centre and right prepared to fight off another Russian Brigade.
The long and the short of it was that the right centre was eventually overwhelmed by sheer weight of numbers although my flank was holding it's own after reducing the spearhead of the Lee's Russian attack down from eight battalions to three through various morale checks under fire etc., it was decided that the Allies would have to withdraw and leave the field to the Russians.
Postie's Shed o' War -which has the space for a 14' x 6' table with all the trimmings- was like a wargamer's Aladdin's Cave. I thought I had some lead but this bloke had got all of the main periods covered and then some in huge numbers -Postie said he has 30,000 15mm Napoleonic figures alone! I saw some of his other armies so I can well believe it.
I had a brilliant time and it was a perfect example of what wargaming should be like, good conversation, lots of good natured banter with a lot of like minded people all enjoying their hobby. Plus, I couldn't knock the in-house catering as supplied by Postie -doorstep sarnies of cheese and pickle with fruit cake to follow. Food of the Gods! Thanks again all for a great day. They even made me and Honoury Member of Postie's Rejects and I have a little 7YW Frech figure on a plinth as a trophy. I'll post a picture of him next time as the camera is upstairs.
Here are some pics of the day.
My initial command
The Opposition!
Our Centre and Right
The Russian Bear ambles forward towards the village.
My Rifles and artillery slow down the battalion on the flank. That's one distracted, only the other seven to deal with now.
Our Centre looks a bit hairy with all that lot bearing down on them.
The Opposition l-r Lee, Ian, John and Smiffy. At this point in the game the Russians were not holding out much hope of success. How fortunes change.
The Russians ride roughshod over the French in the centre. The Russian cavalry -who up until that point had been described as cr*p- suddenly found their battle mojo and made short work of the French cavalry on the far flank, two battalions of Imperial Guard were forced back as was the line unit just to the right of the building. With no stable right flank -and not much of a centre either- the French CNC had no option but to call for a withdrawal.
In case you were wondering, the small pieces of white craft pipe-cleaners are first fire markers.
Saturday, 24 September 2011
Bin a long time
To paraphrase Zeppelin, 'It's bin a long time since I...' posted. I haven't actually got any excuses apart from I've been painting some chaps and B&P for the new project, namely 15mm WWII Skirmish.
So far I have 3 platoons of Waffen SS done and some localised support weapons prepped i.e. tripod MG34's and 81mm mortars. I don't intend to go to town on this one but I do intend to get some Russians at Derby to face them. What I had in mind was a reasonably small affair with tanks taking second place to infantry scrapping it out. Don't mind the odd Hanomag or equivalent but I'm trying to concentrate on the smaller aspects rather than a refight of Kursk. Company level at most.
Included here are some pics of what I have been up to.
The first two platoons of infantry. Figures are Flames of War that I bought years ago at a Manchester do and have only just got around to painting -using Vallejo acrylics, gloss then matt varnished. Bases are from a bakelite type of stuff that I was given by an electrician about ten years ago -I'll be using MDF for the next lot. The orange bits are my first experiment with the coloured sand that seem to be prevalent at the mo. tufts are cuts of painted sisal string.


First squad

Squad LMG

Now here are some pics of a couple of pices of terrain I've made.
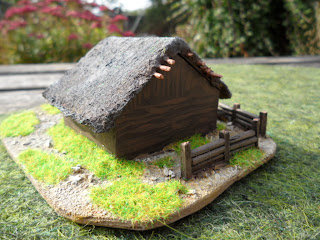
A Russian thatched, wooden barn. As you can see from the first two pics, the barn walls are made from scored foam board which unfortunately doesn't show up too well on the finished article so that's why I had to highlight the planking effect. The door frames and hinges are just thin cuts of cereal packet card. The staves sticking out of the roof were a common sight on this type of building and were made from the copper wire found in two core flex and run the whole width of the roof. they were superglued onto a folded piece of card and when dry, another piece of card the same size as the first was glued over the top. Any gaps were filled with either Polyfilla or the thatch was brushed down to cover. The thatch itself is made from a cut down piece of children's play felt, glued onto a base and covered in watered down Polyfilla or similar to harden it. (TIP. If you use a stiff brush it combs out the felt as you go, making it look more realistic.) Fencing is made from unsharpened cocktail sticks for the horizontal bits and modelling matchsticks for the the uprights. Holes were drilled through the base with my trusty Dremel for the uprights for greater strength. Bases done in the usual way.


Pictures of the completed barn


Next up is a log cabin.
Made from cocktail sticks glued to a backing piece of the ubiquitous cereal packet card; these were a bit tricky because I tried to get the extended corners look by interlocking the sticks. Smaller, fiddly pieces of stick were cut for the door and window shape. Upright sticks made up the door frame and card outlined the window. Thatch made as for the barn only in horizontal, overlapping strips rather than just a single piece. Roof is detachable. Hedge is clumpy stuff hardened with a PVA/water mix and then dry brushed. Flowers are more of the coloured sand.


The two buildings together


I'm halfway through making a couple of simple thatched cottages and I've even got two Timecast? models to paint. That will give me a total of 6 buildings so I suppose I'll have to make a church to go with them.
So far I have 3 platoons of Waffen SS done and some localised support weapons prepped i.e. tripod MG34's and 81mm mortars. I don't intend to go to town on this one but I do intend to get some Russians at Derby to face them. What I had in mind was a reasonably small affair with tanks taking second place to infantry scrapping it out. Don't mind the odd Hanomag or equivalent but I'm trying to concentrate on the smaller aspects rather than a refight of Kursk. Company level at most.
Included here are some pics of what I have been up to.
The first two platoons of infantry. Figures are Flames of War that I bought years ago at a Manchester do and have only just got around to painting -using Vallejo acrylics, gloss then matt varnished. Bases are from a bakelite type of stuff that I was given by an electrician about ten years ago -I'll be using MDF for the next lot. The orange bits are my first experiment with the coloured sand that seem to be prevalent at the mo. tufts are cuts of painted sisal string.


First squad

Squad LMG

Now here are some pics of a couple of pices of terrain I've made.
A Russian thatched, wooden barn. As you can see from the first two pics, the barn walls are made from scored foam board which unfortunately doesn't show up too well on the finished article so that's why I had to highlight the planking effect. The door frames and hinges are just thin cuts of cereal packet card. The staves sticking out of the roof were a common sight on this type of building and were made from the copper wire found in two core flex and run the whole width of the roof. they were superglued onto a folded piece of card and when dry, another piece of card the same size as the first was glued over the top. Any gaps were filled with either Polyfilla or the thatch was brushed down to cover. The thatch itself is made from a cut down piece of children's play felt, glued onto a base and covered in watered down Polyfilla or similar to harden it. (TIP. If you use a stiff brush it combs out the felt as you go, making it look more realistic.) Fencing is made from unsharpened cocktail sticks for the horizontal bits and modelling matchsticks for the the uprights. Holes were drilled through the base with my trusty Dremel for the uprights for greater strength. Bases done in the usual way.


Pictures of the completed barn


Next up is a log cabin.
Made from cocktail sticks glued to a backing piece of the ubiquitous cereal packet card; these were a bit tricky because I tried to get the extended corners look by interlocking the sticks. Smaller, fiddly pieces of stick were cut for the door and window shape. Upright sticks made up the door frame and card outlined the window. Thatch made as for the barn only in horizontal, overlapping strips rather than just a single piece. Roof is detachable. Hedge is clumpy stuff hardened with a PVA/water mix and then dry brushed. Flowers are more of the coloured sand.


The two buildings together


I'm halfway through making a couple of simple thatched cottages and I've even got two Timecast? models to paint. That will give me a total of 6 buildings so I suppose I'll have to make a church to go with them.
Monday, 24 January 2011
Latest terrain projects
Back at work today and remembered to bring the camera home so here are the promised pics of my latest terrain projects:- the finished woodland pond and a couple of small hills.
1. First off, the pond. Everything is finished apart from the foliage. I put this one in because I like the lighting -it shows up the water effect quite well. Only a single coat of gloss varnish.

2. The completed pond, taken a bit further away from my painting lights. I managed (don't know how, though), to avoid glare from the water.

3. Basic hill construction. Offcuts and bits from various thicknesses of polystyrene -acquired just in time from a local skip- were glued down with wood glue to a irregular piece of thick card and some slate pieces glued were down with Hard as Nails. The whole lot was then covered with strips of masking tape that extended under the base. The masking tape used is the cheap stuff from Poundland. Don't worry about any folds left from where the masking tape has creased, they add to the topography of the piece. I like to use the odd rock, stone or pieces of slate to add a little weight to the piece.

4. The whole top surface was then covered with the ubiquitous sand and wood glue. Once dried, to represent earth collapse, some small pieces of unused cat litter were glued down with wood glue. For more adhesion and to fill in some of the major gaps all the litter was covered in diluted glue. Then more sand was glued down along the top of the litter for continuity.

5. Both new hills together. A quick blast across the top with an unperfumed extra-hold hairspray to keep the flock on and the ball's in the net.

Wednesday, 19 January 2011
It's back!!
Yahoo! My figure painting mojo has returned from wherever it disappeared off to for the last couple of months!
Today, being off work with a ear infection that affects my sense of vertical balance and makes me feel a tad Uncle Dick unless I am sitting down, I finished off the first 18 of the 3rd Sassy Levy unit and undercoated the remaining 12. Still got to work out what standard I am going to give them yet.
I also finished off the second hill. A few passes with a can of extra strong hair spray keeps the flock on. Pics soon.
Next project update: Still haven't found the box of 15mm ACW figures yet.
Sunday, 9 January 2011
A woodland pond
This is really a WIP just to show the stages of construction.
The first picture has already got all of the basic elements in place. The observant reader will have noticed that the tops of two stones have been left uncovered.

The reason for the lack of wood glue and sand is because I have a weighty piece of steel that I lay across things to stop them warping.

The water is now done and varnished with a single coat of Ronseal Gloss varnish, the base colour is on and the reeds have been a coat of ochre. This was a learning exercise for me in that I have not made such a large area of water before.
HINT. If possible paint and varnish the water BEFORE you wood glue and sand the thing because the sand gets everywhere, even when you thought it was all stuck down!
Who's been a busy little chappie, then?
Recently, I have been mostly making terrain. So far I have several single trees, two pieces of broken ground using old cd's as the base, two small woods/copses/spinney's on card bases and a woodland pond (currently unfinished but just needing a bit of drybrushing and some foliage glued on).
I thought I would share my method of construction. The basic construction is the same for everything, it's just the materials and the application that occasionally differ.
1. First off there is the broken ground on a cd base as mentioned on the post before last.

Simply done.
A) Scratch a cd base with some glass paper to increase the adhesion.
B) Using some propriety adhesive such as Hard as Nails or Sticks like S**T, glue various sized stones on the base.
C) Fill in the gaps around the bottoms of the stones with filler.
D) At this point you can stick down some home made tufty things (as outlined earlier in the blog).
E) Cover with wood glue and sand, then paint.
2. Next the small wood. For this I used twigs cut from the last of the seasons hedge trimmings as the trunks.
A) Glue some random stones down as outlined above and, using a contact adhesive such as Evostick or UHU, stick down the trunks in a previously arranged dry run. Put glue on both surfaces and leave it to go tacky before pushing the two together otherwise you will have to prop up the trunks so that they don't fall over.

B) Once the glue has dried thoroughly slop some Hard as Nails all around the bottom of the trunks as another layer of adhesion. Once this is solid then add the filler; a further covering around the trunk bases, gap filling on the stones and some random lumps to break up the flatness of the base.

C) Once that has dried cover with wood glue and sand.

D) I now paint all my bases in exactly the same way with the same colours. First off is a coat of a mid earth brown -mixed at Homebase- followed by areas of a wash of burnt umber.

E) This is followed with dry brushed Antique Gold and then Cream, both acrylics from Anita paints. Attach some patches of flock and shrubs and the base is finished.

F) In the summer I saw some dyed sisal used by people who make their own hanging baskets and thought it may work for tree canopy. If it worked then at £4.99 for a big bag it should make about 20-30 trees -cheap as chips. The 'branches' of the twigs are now coated in contact adhesive and clumps of the stuff are glued on. Trim off any errant string and that's it.

The figures have been included for scale. They are the small diorama of some 15mm Sassanid levy preparing to defend themselves against an enemy threat.

There are four layers of gunk around each of the trre trunks so that should hold them securely in place. The only thing with these is that you have to wait for each layer of gunk to dry before you can slap on the next. But I think it's worth it.
Another method I thought of was using pipe cleaners for tree trunks. This method involved twisting three or four together, leaving about an inch at the bottom to splay out for the 'roots' and make them as tall as you like. Glue the roots using a hot glue gun to a piece of thick card or one of those custom made circular bases. I have added a couple of small stones for a bit of added weight.
(In the background you can see the next unit of levy half done as well as some more undercoated Hunnic Mongols.)

Paint the trunk with a reasonably thin mix of wood glue, filler and water and when dry paint and add the foliage.

Keep yer bristles moist.
Mick
Thursday, 16 December 2010
Swining weather!
Well, since the last a fair bit has happened -some of it may even be interesting.
You know how sometimes you don't fancy painting but want to watch the telly even less? I had one of those evenings a few weeks ago, so just for the craic I typed my name into Google to see what I had been up to on the tinterweb. I found an item that said some bloke had got a set of WWI Rules from me some 30 years ago. I traced the link and found him on the WD3 Wargaming Community. Sent a message via the forum and found out that we went to the same wargames club in Southend decades ago. Still chatting every so often. How small the electronic world can be.
The most amazing thing happened to me at work the other week. I was talking to a colleague about nothing much when he said he noticed that I was always reading in the canteen and that he had a book I might be interested in. I thought nothing more of it until a week later when he gave me a carrier bag. I opened it to find a hand written diary from his missus' grandfather who was in the RGA in WWI and it was an account from early 1917 to mid 1918 when he was sent back to Blighty. Hand drawn maps and all. Court martial offence if discovered of course, but what a read. What I have is actually a copy made by him immediately on his return to England while the original, apparently covered in muck and who knows what else, currently resides in the Imperial War Museum.A contemporary account that is over 90 years old. Fantastic stuff!
Made some trees using twisted pipe-cleaners for the trunks and some hanging-basket-filler-stuff I bought from Homebase (a DIY chain here in the Old Country). Took some each-stage pictures then, by accident, promptly deleted them all- Muppet. I'm quite impressed by them. Got some dried privet twigs left over from the last hedge trim of the year on the worktop so I'm going to try them out next. Probably not as versatile as the pipe-cleaners for bendiness but will be finished a lot faster. I also tried out the method of using old CD's as terrain bases and made a couple of rocky outcrops which look pretty good as well. Once again, due to my mechanical ineptitude I lost those pics as well. Sphericals!
I've made a decision to integrate the two blogs into this one, so all further writeups about the Sassy's and the Byz Boys will be on this one along with everything else.
The weather here -either rain, cold, overcast, wind, snow or a combination of all of them-hasn't really been conducive to external photography which is all well and good because I haven't really got anything new to show you. The 3rd unit of Sassy Levy, (Donnington Figures), is more than half finished but I had a minor Sabbatical on them while terrain building. Not much left for them now, then I might make a more serious start on the Byz Boys.
or
I might just start a new project.
Bit of historical background here. Years ago that nice Mr Macfarlane run a show at Birmingham Uni in Edgbaston. I was in a club that offered to help the traders to move their wares in and out of the venue and as a thank you we were given chits that were redeemable at various manufacturers. Now with my chits and some judicial swapping I managed to acquire enough credit wonga to purchase a whole mess of figures. To date those figures have sat in a box somewhere in the manse. When I can find the little monkeys they will be the start of my new period...15mm ACW. Now this is different because all I need to buy is the Rebs because I believe I already have all the Bluebellies in the shape of inf. cav. and art. I will need. I also have a copy of Fly & Furry Rules so I might use them although I'm unconvinced of 20 x 20 bases with 3-5 figs on each. Yes, alright, thats the ruleset standard but I don't want RSI from shifting all the bl**dy bases around. At the other end of the scale my usual 60 x 40's are just too big -an 8 base brigade comes in at a huge 480mm or over 18" frontage; far too much for my board. Hmmmmm, needs a bit of thought.
The other thing that has stopped me in the past is that, years ago, there was a book-shop in Brum from a nationwide chain called County Books. From the Military Section I purchased a bout 15 imported books on the ACW -the usual fare, battles, biographies etc- including books II, III and IV from the definitive Battles and Leaders of the Civil War for about £7.99 apiece. I obviously asked about the first book and was told that it would be in at some time. Well, that was about 10 years ago, the Bull Ring has been pulled down and rebuilt and you guessed it, the shop went with it. No bl**dy book. Then, last month on whim, I checked Amazon. It was there, Book I of the Battles and Leaders. So that is my Crimble pressie from YO this year. Now all things considered, in early 2011 I will finally get round to reading the whole set.
Subscribe to:
Posts (Atom)