Monday, 11 July 2011

First ever solo game...Part One

This post actually contains several firsts. One is that it is my first ever solo game, second it is my first ever BATREP/AAR (whatever you want to call it), and the third is my first playtest of my very own Far Eastern Medieval Rules, 'The Fury of the Tartars'. Yes, I know I have used the European spelling for Tartars as opposed to Tatars -who really were a nomadic tribe of the time- but it's easier. The rules cover my favourite historical period, that of the Mongol conquests, starting from before the tribes were united under Chinggis Khan and running up the Yuan Dynasty of China, including all campaigns within that time period. So far, the lists are nearly done for the Mongols up until 1237 and the Khwarizmians, so I thought I'd give them a go.

A bit of background on the rules. Alternate move depending upon Initiative. Each army has a Ferocity Factor plus a D6 roll that is instrumental in which army has the Initiative and choice of first or second move for that Move. To move or change formation each unit must pass a Competency Roll -the better the training the easier it is to pass i.e. Superior Trained troops need 2-6 on a D6 to pass whereas Levied troops need a 5 or 6 or they will continue with the current order or just halt. The same is true if troops leave the Control Area of their commander whose status is determined at the start of the game.

Each troop type, Skirmisher, Support or Battle has its own basic move distance augmented by the roll of a D6.

There are three basic factors, Attack, Defend and Firing and these are used in whichever situation is relevant. To cause damage to a unit from Firing the Firing and Defend factors are compared, other factors are then added or minus-ed and each unit rolls a D6. The resulting difference is cross-referenced on a chart to determine the result.

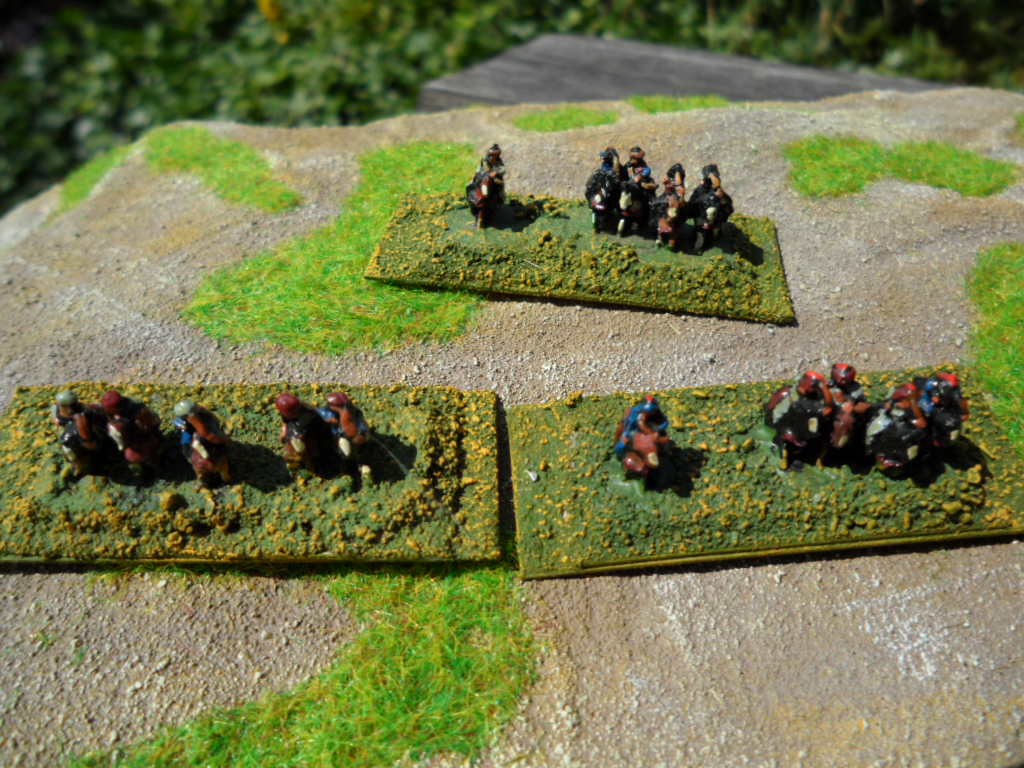
Photo 1
The Khwarizmian Set-up.
Blissfully unaware that the enemy has reached this far into the homeland, Sultan Abd Ad-Dill is responding to Muhammed Shah’s call to arms and has his own bodyguard of Kangli BC, 3 units of SkC and a single unit of untested levy infantry from the outlying villagers of his demesne. He is marching to Masalim to pick up the last contingent of his army before going to Samarkand. Unfortunately, Abu ad-Dill is an Indifferent Commander which allows him to have a 150mm Control Radius. In the top right hand corner can be seen a unit of Mongols in ambush position.


Photo 2
The Mongol Set-up.

One of Snoopy Bahadur's outlying scouts has reported spotting a column of Khwarizmian troops. The scout got close enough to determine that the column consisted of at least 10 hundreds of cavalry and 3 hundreds of infantry. They will soon be passing through the Pass of Abu-Sinbar obviously on their way as reinforcements for Samarkand and will pass closely by the village of Masalim, currently invested by Mongol troops. Leaving a single mingghan to ensure that the villagers do not sortie out, he turns with the rest of his available tumen -2 mingghan of Skirmish Cavalry (SkC) and a single mingghan of Battle cavalry (BC) to set up an ambush for the oblivious Khwarizmians. Snoopy Bahadur has rolled to be a Competent Commander giving him a Control Radius of 300mm.


That's it for Part One, more next time.

Friday, 24 June 2011

6mm Terrain

Now that the boards are done I thought it might be time for some more terrain construction. So I made a wood of deciduous trees. Now these caused untold bl**dy problems in that the clumpy stuff only stuck to the cocktail sticks as long as nobody was looking. When touched it fell off at the slightest opportunity. I was that racked off my first thought was to use an oxy-acetalene torch to keep it together but after calming down a bit I went with my second option, contact adhesive. This seems to have worked because nothing further has moulted...yet. The consruction method is the same as all my other terrain pieces.


Next up is a view of my first ever solo game and playtest for my own 'wot I ave wrote' rules, The Fury of the Tartars (WIP).

The setting is this. A half tumen of Mongols under the command of Snoopy Bahadur is attacking isolated villages to deny them to the enemy. A larger Khwarizmian force, commanded by the rather inept Sultan Abn Ad-Dill is on his way to Samarkand, collecting up the militia of the various villages and towns on the way. The village of Masalim, on the far right of the picture, is his last village. He is blissfully unaware that any Mongols are in the area. The picture has been taken at the end of the second move one mingghan of Mongols has sprung the trap. More photos and an AAR in another post.


A closer picture of Masalim, with its militia ready to march. (This has been entered into the Angel Barracks current terrain making competition.)


Finally for this post a picture of a mingghan of Mongol Battle Cavalry in ambush position behind a small hill.

Sunday, 12 June 2011

Started the marathon base repaint.

Now that I have my boards all the old bases need to be repainted to fit in. Made a start over the last few evenings and now have all 64 bases of 6mm Mongols finished. Next up will be the 6mm Sassanids because I can use them as Khwarizmians.

I had a rummage through my unpainted 6mm box and would you believe it, I don't possess a 6mm Chin/Song/Jurchen army. Got a generic Medieval European force (mostly unpainted) and others can be pulled in to make up any number of opponents but no Chin; so thats gone onto the Derby list of 'Things to get'. Plus, having a look on the Irregular website, I quite fancy at least one of their Chinese villages,(that's on the Derby list as well for at least a gander).

The first picture shows the 'before' base colour and the second gives you an idea of the 'after'. Personally, I think that the 'after' is much better as the light base shows off the figures nicely, (only about another 20 6mm armies to go!!??!!).

Why do we do this to ourselves, but at least it's just a repaint and not a rebase and repaint, that would drive me well beyond Batso!


Oh well, back to the grind.

Mick.

Friday, 3 June 2011

More terrain

(Two in the same day, whatever next, eh?)

This time it's a small wood. The base is a piece of thick card of which luckily I have s**tloads. Pieces of garden slate (not mine) and small strips of irregularly shaped lumps of polystyrene are stuck down to breakup the flatness. The whole thing is covered in PVA and sand mix before being painted in my usual base colours.

NB. I always make sure that I can lay my Yet-To-Be-Patented pieces of steel across the piece to prevent warping. In this case it was across the tops of the slate. this procedure is done as well when the base coat is painted on. It might take a little longer but hey, it's only time and what's the rush?

The trees are once again scourers and cocktail sticks although some of the larger trees have BBQ skewers as the trunks. Holes are drilled in the base and a drip of PVA in each hole will secure the tree. Other bits of foliage are added but not too much as I wanted to leave some gaps for figures. I suppose to thicken it up some lichen can be put in the gaps.


The second picture gives you an idea of scale with the Warrior model.


Now that I have my boards I'm going to need a lot more terrain, especially for WW II and more recent. I know, I'll start tomorrow.

Mick S.

Loft face-lift Part I

Trust me to pick one of the hottest days of the year to date to start on the loft. I must have lost several pounds just moving stuff around and I tell you, my knees will never walk again...carpet tiles are not the best thing to be kneeling on.

But there is an up side to this. I have managed to get most of my unpainted lead mountain into one and a half office storage boxes apart from the 6mm stuff which fills a plastic carrying box that is 9" x 9" x 15" on its own aaannnddd I found another load of 10mm Mongols and Chin, at first guess about 3 units of each and including another couple of rockets. Also found the 15mm ACW artillery I was looking for earlier but still no sign of the infantry et al; more 15mm Prussian Napoleonics; 15mm Mongols including the unit of keshik I had on my list to buy at Derby this year; 15mm German WWII infantry, support weapons by FOW and vehicles from an eclectic mix of manufacturers, and finally, all my unpainted WSS stuff.

The-what-I-thought-was-the-last-of-the-10mm-Mongols-and-Chin are coming along nicely. All the cavalry have been done and once I finish this post I shall start on the Chin Xbows, then the rest of the recently discovered 10mm figures. I intend to have a go at getting one of the rockets being in the air.

Mick.

Thursday, 2 June 2011

Finally, the boards are done

Yesterday was a nice day so I though I'd take the bull by the horns and go for it.

Here are a couple of the sheets used. The sheets were bought from Wickes's a few months ago in readiness for the summer.


First things first, give the boards a protective cover on the sides. Now here I had my first hiccup. Being me I didn't look and the height measurement and assumed that it was 50mm but it wasn't it was 52mm! So I had to give the edges two pieces of adhesive tape to cover the whole thing. Hiccup two,I had only bought one roll of tape, well you would if you thought that the total length to be covered was 10.2m and you had bought a 15m roll. So I had to troll off to the shop to get another roll.


Then all three boards were given a coat of PVA using a roller (much quicker than a brush), and covered in beach sand still with bits of trilobite shell in it.


Following this they were given a coat of my base colour (Dulux shade 5010Y30R known as Eclipse Deleted). This was also rollered on with the occasional flick of the roller to remove bits of loose grit.


Then I learnt a new technique- new for me that is- dry-brusing with a roller. Now the rollers I was using were the cheap but eminently functional 4" foam from a local £1 shop -got 4 rollers, 1 handle and a tray for me money, bargain. First colour on was Homebase Warm Yellow followed by a lighter brushing of Summer Jasmine.


Finally, patches of flock were glued down and when dry, the whole thing was give a healthy spray of PVA and water to seal it. Job done. Three boards, half a days work in the sunshine even allowing for the paint to dry.


Just need more terrain pieces now...and the space to set it up. Note to self, sort the bl**dy loft out.

Tuesday, 31 May 2011

Bl**dy Trees

The ongoing tree situation. Fir trees, piece of p*ss, however the deciduous variety is having a right flippin' Turkish! Had to dip the little s*ds again as they were harder but not hard enough (if you know what I mean missus). Perhaps third time lucky.

Got the last 20 10mm Mongol cavalry and the final unit of 18 Chin crossbows undercoated last night and they are ready to go, hopefully I should have them done in a couple of days. This will give me 24 bases of 4 Mongol LC each and 9 bases of 8 mixed HC & EHC. The Chin have 3 bases of 8 HC, 9 bases of 4 LC, 6 bases of 12 HI, and 18 bases of spears, bows and Xbows militia and 1 base of 2 rockets.

What about the boards, I hear you say. Well, I reply, I've got all the stuff now, paint, sand, PVA, and disposable roller for glue and paint and tape for the edges so all being well (and fine) should start tomorrow; I'll take pics as I go.

Don't forget, it gets drier quicker in the heat.

Mick

Monday, 30 May 2011

Latest 'borrowed' idea

Just to let you know what I've been doing over the last few days. I decided to make another couple of hills for the soon-to-be-completed boards, (weather permitting of course, but if todays flying wet stuff is anything to go by...?) While I was making one I had another light drizzle -wasn't powerful enough to be called a brain storm- why not make a wooded hill? All well and good but trees in 6mm? Haven't got any. Then a sepulchral voice came into my head, 'Remember Matakishi' it said. Of course, one of the items there was how to make 25mm from skinned twigs and chunks of kitchen scourers, or Scrubbies as I've heard them referred to. I had previously scaled down the idea for 10mm using barbie skewers,(the wooden type not the doll), so now I went a step further by using cocktail sticks.

Now I'm not going to give you a picture step by step because it's self explanatory. Buy scourers and toothpicks costing about £1 for a pack of 4 including a tub of sticks. Paint sticks in your tree bark colour. Pull off decreasing sized chunks of scourer -you normally get 2 trees and about four or five layers per stick. Push largest piece over pointed end of stick and push down until near the bottom. Continue with smaller sizes of scourer until only one is left. Blob some PVA underneath the lowest piece to glue it in place then put a blob on the top of the stick. Push last piece onto stick making sure point is covered. When the glue is dry you can give tree a quick dry brush if required.


Now I use polystyrene bits stuck to thick card and covered with strips of masking tape and PVA and sand to make my hills, so making holes in them was simple enough using a pin vice with the right sized drill bit inserted. Dab of PVA in the hole to secure the tree and Robert is your mothers sibling.

This particular example is about 6" X 4" and about 3/4" tall at highest point. I have included a British Army Warrior for scale.


This third pic shows a copse of just a couple of trees stuck to pre-terrained circle of laser cut MDF with the Warrior again for scale. (Not my best pic this one.)


I am also trying to make some deciduous trees by using cocktail sticks and some clumpy green stuff. The idea worked until I dipped said trees in a PVA water mix when most of the stuff fell off. Not to be deterred I tried again with a little more success. Left them overnight to dry. Found out this morning that there had not been enough PVA in the water and that the foliage was still relatively soft. Bo**ocks! Added some more PVA and had then Devil's own job mixing it...then read the bottle and found that the this particular brand of PVA is water resistant. Senior Moment or what? Eventually got it mixed reasonably well and have dipped them again and left them till tomorrow. Not holding my breath this time to be honest.

In the meantime I timed myself making some more scourer trees. Allowing for the fact that the sticks were already painted it took me no more than 15 minutes to make 6 trees. How simple is that?

Monday, 23 May 2011

Modern Update

Just to let you know I haven't fallen off the edge of the world or anything but occasionally, the outside world gets in the way.

Well, the Russians are coming along apace; in fact so much so that I've nearly finished them. Painted at present there are 3 tank battalions of 9 models apiece (2 T72 and a T55), 1 motorised infantry battalion of 10 bases and the divisional headquarters of AA, bridging, mine-laying, recovering and other such support stuff. 1 more infantry battalion to paint and thats it.

Next week should be interesting if the weather holds. I intend to get outside and have a go at covering the boards that I bought a few months ago (remember them?). If it works I'll put some piccies up.

Been making some more terrain B & P's such as more explosions -6 so far -but none with any cotton wool as yet. I've concluded that they can be used in various scales up to and inc 25mm as grenade bursts. Also made another, small, hill for the boards.

Mick

Thursday, 12 May 2011

Had a half-a-crown moment there.

Boy, was that a worry. Turned on the old pc, started up Opera and went to have a look on the blog. As I scrolled down I noticed that all my photos were missing and on investigation found that I couldn't log in and a message that said something along the lines of blog has been cancelled or terminated or similar was glaring malignantly at me. What! I hadn't done anything naughty or broken any rules that I was aware of, so what was going on? Went onto the Help pages and it said that Help wasn't currently available in my language. Now what? Still feeling a tad concerned over all the lost info I tried once more...and there it all was in glorious colour. Phew, that was close! Anyone had anything similar?

Now onto more interesting matters.

Had a thought the other day while looking at someones pics from Salute. 6mm explosions or fall of shot markers. Then of course the next thought was how do I make them? As the Meerkats from the adverts say 'Simples!' So here is my first attempt along with a H & R T72 for scale reference. Can you guess how I made it?


I found a bag with some old 25mm round bakelite like, plastic, washer type things so, using that as a base I folded a humble pipe cleaner four times and then glued it down with some UHU. When dried I covered the cleaner in watered down PVA then, when that was dry, using neat PVA, I put some dabs on the arms and stuck it into my 'slightlier-chunky-base material' bag. When that part was dry I gave it another coat watered down PVA for extra adhesion for the bits. The whole thing was undercoated black and dry-brushed in ever lighter shades of grey. The 'slightlier-chunky-base-material' bits were painted to represent chucks of earth thrown up by the explosion. Some flashes of red in the middle and thats it, all done. Make up the base in your own style and there you have it. Might make some with some smoke billowing out as well. (Made from cotton-wool and stuck in the middle of the bend. Thought just occurred to me, different types of shell could be represented using different colours of cotton-wool.)

I'm on a roll here, I've already got another half dozen made up with the UHU drying as I type.


Don't let yours get dry,


Mick

Monday, 9 May 2011

Another Bargain had!

Now I am a regular visitor to our small, local library. I say regular because it's once every four weeks when my books are due. Normally, I use the place to get books that I classify as past-time reading i.e. thrillers, horror, sci-fi, fantasy etc. While there I always have a quick gander at the For Sale trolley and very occasionally, I might find one historical tome that catches my eye. This time I found not one but six, namely:
The Warriors Way, England in the Viking Age by Stephen Pollington. Lots of pictures and maps and things.
The Wars of the Roses by J R Lander and Richard III, The road to Bosworth Field by P W Hammond & Anne F Sutton. This is a period of our history that I will go on record as saying that I know very little about beyond the fact that it happened and that we had King Henry VII at the end of it.
Monty's Marauders by Patrick Delaforce. An account of the Red Fox 8th Armoured Brigade from its beginning to the end of the war.
Monte Cassino by David Hapgood and David Richardson and Cassino The Hollow Victory by John Ellis. Again, have sketchy knowledge about this particular episode of WW II.

So that's six hardbacks from the Discarded trolley at the princely price of 10p apiece. Can't be bad. you never know, I may even get round to reading them at some stage.

Don't want to talk about the Hammers and haven't done for quite a while. I will be pleasantly surprised if they manage -against the odds- to stay up, but I'm not holding my breath. And if they do go down no doubt some of the players will want out; if they had any loyalty, they would stay and get the club back up straight away, but I can't see that happening either.

Monday, 2 May 2011

History Revisited - Part Deux

This time I thought I'd share pictures of some of the original buildings of Tunisia.

The first two are of a village by an oasis in the foothills of the Atlas Mountains. It was abandoned after suffering from flash floods back in the 1960's. The government relocated the village further down the hill side.

The others are from an abandoned village on the outskirts of the Sahara Desert near Gabes in the south of the country.

Gives you an idea of colour and construction detail. The place is as dry as a witches wossname so I can't see much in the way of colour change except for maybe some fading due to the incessant sunshine.

(Apologies about the quality of the last three. My main camera had run out of battery power and the backup was only 4 megapixies and trying to take photos from the back of a moving camel is definately not the best idea in the world.)

I tell you, the Sahara is an incredible place -there is absolutely no sound apart from the odd camel herder sounding off or a camel passing wind. It is definitely near the top of my '50 places to visit before you die' list.


PVA Fixative (contd)

On a more recent note, I gave the whole of my Modern Brits a coating of PVA spray earlier today to fix the foliage in place. Can't say that it was 100% successful with some foamy bits going harder than others but at least most of the hairspray sheen has now gone. The problem is that the stuff tends to pool in some of the lower areas and if left alone will dry cloudy but having a piece of kitchen roll to hand will soon put a stop to that. Overall, reasonably impressed; will definitely continue using it.

Here's a photo of my collection of Modern Brits to date...all 122 bases of them. As you can see, some of them still have a slight eggshell look to them but believe me, it's not that noticeable.


Now it's on with the Russians, so far two tank battalions finished -one of T55's and the other of T72's.

History revisited

For all you Ancient wargamers out there I thought I'd give you some views of the 'Ribat' at Sousse in Tunisia -taken by myself in 2009- for colour, texture and construction details. The actual construction of the main building dates back to the late 8th Century AD with the watchtower being added in 821 AD. There was some more work done in 1722 and it is possible that the doors in pictures 3, 7 and 8 were added at this time. the only reasoning I have for this is that the lintels look newer than the rest. The whole Ribat was heavily restored after some serious bombing in 1942-43.

Originally a religious institution, in exchange for special privileges, the occupants were the watchers of the coastline to give warning of any approaching Byzantine fleet. Fires at night and smoke during the day from the watchtower could pass the information on to other coastline forts.

All pics are of course clickable for in-yer-face detail.

1. The Entrance Porch on the south face.


2. A closer shot of the Porch.


3. Detail of a small door on the eastern face.


4. Looking north-north-east, another shot of the Porch.


5. Looking at the north face.


6. Square Watchtower with circular tower above in the south-east corner.


7. Another small door either on the north or west faces.


8. Same door as in '3' but additionally, showing the battlements.


The next five shots are of the interior.

9. On the north wall looking south towards the entrance.


10. Circular corner tower battlement detail.


11. North-eastern corner looking south towards the Sqaure Watchtower. Nothe the crenelations on both sides of the walkway.


12. More tower battlement detail.


13. Showing courtyard. Taken from south-eastern corner looking to the north-west.


If anyone wants some more details just let me know, I have a copy of the Guide book from this ribat as well as the one from Monastir. Also have a copy of the official guide book from Carthage (whats left of it).

Sunday, 1 May 2011

Biting the fixative bullet

Today was another nice day weather wise, so after the missus had gone off to work and all the animals sorted, I say all, we have one cat, Tasha, and two recently acquired kittens, Archie and Willow, but they all need feeding and the litter tray sorting and I need feeding etc. So at about eleven thirty I decided to bite the bullet on fixative and try a watered down PVA spray on the new road system. The result was 'Busting1' (as they say hereabouts). Covers like a dream and not a single strand of static grass came loose afterwards. The only problem is that at first the PVA spray came out a bit blotchy so I had to do a quick dabbing and mopping job with a piece of kitchen roll, but apart from that the system works a treat. Doing the job outside meant that the spray dried in less than ten minutes. My next trial is to see if it will negate the sheen left by the hairspray fixing method on my 6mm Moderns.

Next time,

Mick.